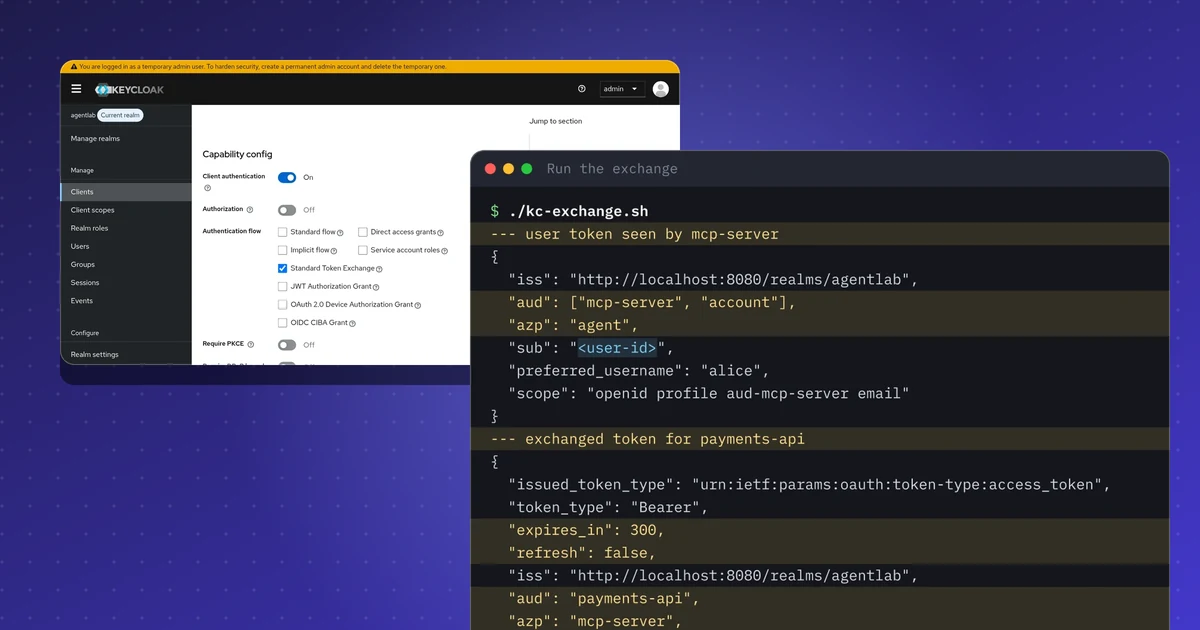
In breve
- Lo scambio di token RFC 8693 permette a un server MCP di sostituire il token dell'utente con uno più ristretto, destinato a una sola API a valle.
- In Keycloak si abilita per singolo client, e l'audience a valle è uno scope facoltativo.
- Il token scambiato mantiene l'utente come soggetto, ha solo l'audience a valle, dura 300 secondi e non include un refresh token.
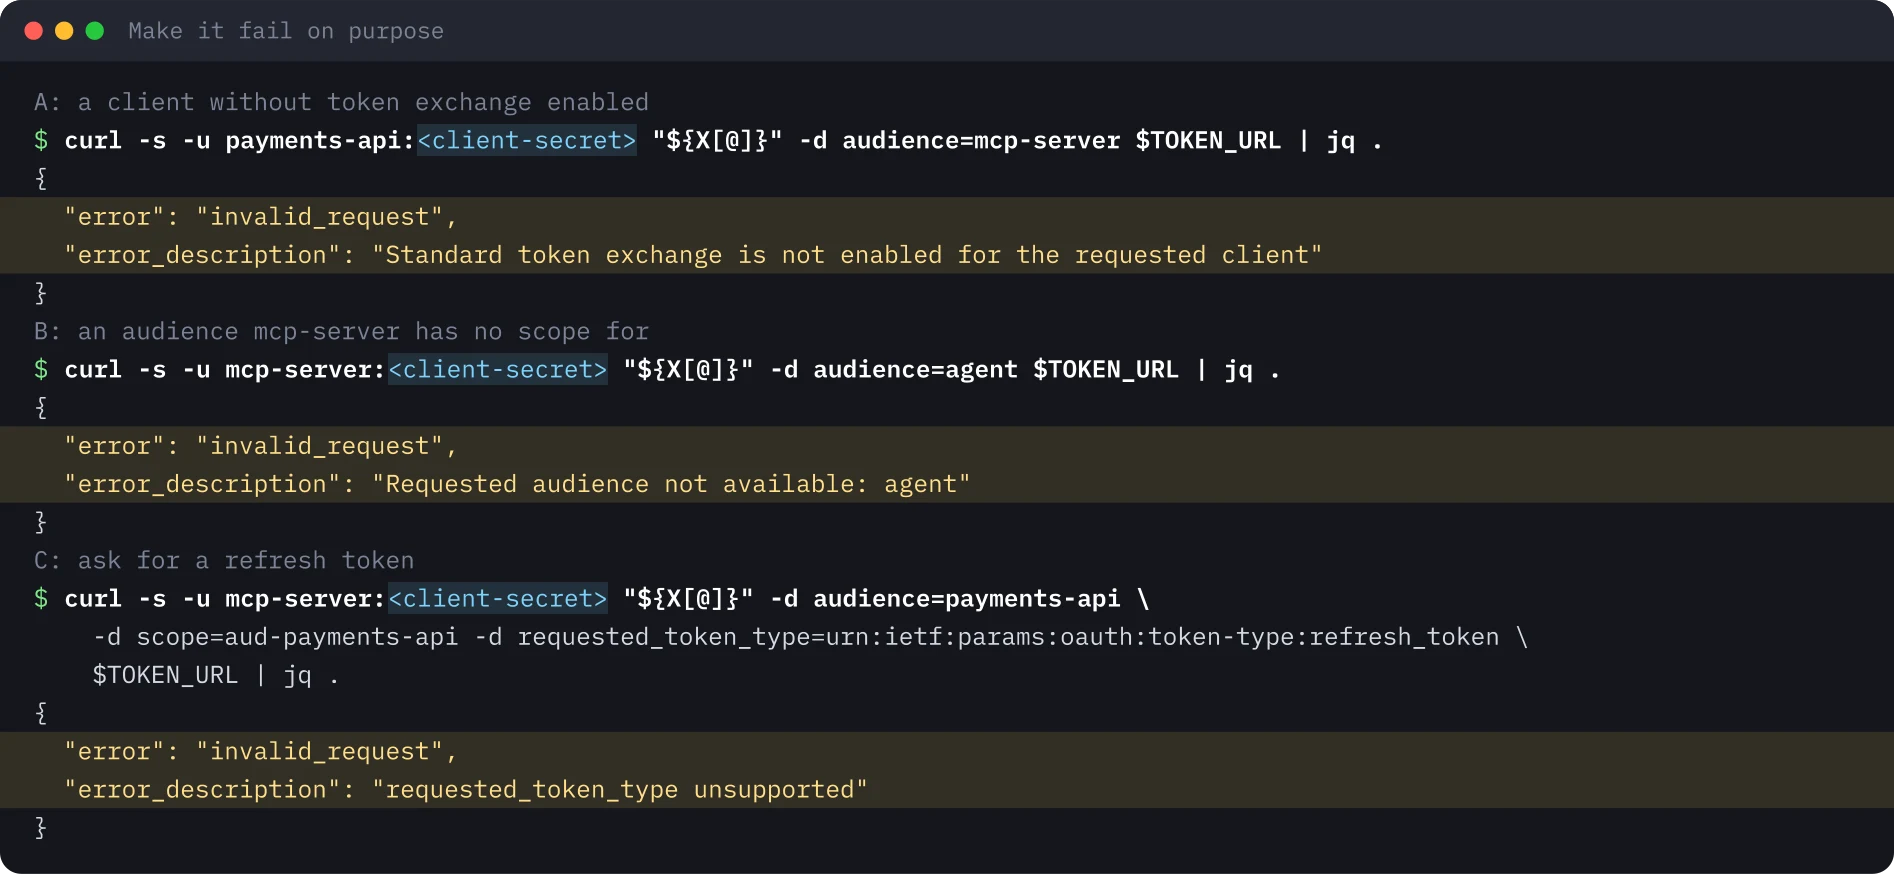
- Tre scambi non validi vengono rifiutati: un client senza il privilegio, un'audience senza scope e la richiesta di un refresh token.
- In questa configurazione non c'è il claim act, quindi il client che agisce compare solo come authorized party.
Ripeti questo lab
Ho scritto questo lab perché tu possa rifarlo per conto tuo. Ogni passo ha i comandi da copiare e l'output che ho ottenuto io, e puoi segnarlo come fatto. Le spunte restano solo nel tuo browser.
Copia un prompt già pronto per Claude Code, Cursor, Codex o un altro agente di codice. Solo per ambienti di test.
Mostra il prompt
I want to run a hands-on lab from iamops.dev, and I would like your help to do it safely.

Lab: OAuth token exchange con Keycloak (RFC 8693): restringere i token per agenti AI e server MCP
Read the whole lab here (Markdown): https://iamops.dev/it/keycloak-token-exchange-rfc-8693.md

What the lab needs before the first step:
- Java 21 (for example Eclipse Temurin), curl, jq and unzip
- Port 8080 free; keep this terminal open and use a second one for the next steps
- Values I have to set myself (the lab uses placeholders): <ADMIN_PASSWORD>, <ALICE_PASSWORD>, <AGENT_CLIENT_SECRET>, <MCP_SERVER_CLIENT_SECRET>, <PAYMENTS_API_CLIENT_SECRET>

How I want you to work:
1. Read the lab from start to finish first (each step lists its own prerequisites). Then check that the prerequisites are in place and that the tool versions match what the lab expects. Tell me what is missing before you run anything.
2. Run one step at a time. Before each command, show it to me and say in a sentence what it does.
3. Ask me before anything that costs money, creates cloud resources, touches a real tenant or account, or deletes anything. Wait for my answer.
4. Use the placeholders from the lab. Never paste real secrets, tokens or production identities into a command, a file or this chat. If a value is needed, tell me where to set it myself.
5. After each step, compare the output with the expected output in the lab. If it does not match, stop and tell me what differs. Do not carry on or invent a fix without asking me.
6. At the end, report what passed, what failed and which cleanup you did. Then offer to tick the steps off for me. The lab page keeps ticks only in my browser, so if you cannot do that, list the steps I should tick.

This lab is for test environments only. Do not run it against production, or against a tenant or account that holds real data or real users.

You may answer in my language.
Il 12 novembre 2026 Amazon Cognito ha aggiunto OAuth 2.0 Token Exchange (RFC 8693), pochi giorni dopo WorkOS Connect. Entra ha il proprio flusso on-behalf-of da anni. Lo schema è ormai comune ai principali identity provider: un servizio che agisce per conto di un utente scambia il token dell’utente con un nuovo token più ristretto, legato a un solo destinatario (audience) e di breve durata, invece di inoltrare l’originale. L’ho provato su un Keycloak locale e ho annotato cosa ha fatto il server.
Questo laboratorio esegue lo schema su un portatile con Keycloak, un server di autorizzazione open source, così si vede esattamente cosa cambia dentro il token e cosa il server rifiuta.
Cosa mostra il laboratorio#
Un agente AI fa accedere l’utente e ottiene un token per un server MCP. Il server MCP deve chiamare per quell’utente un’API di pagamenti, ma non deve inoltrare il token dell’agente. Lo presenta invece al server di autorizzazione e chiede un token valido solo per l’API di pagamenti.
Il laboratorio usa tre client in un realm:
| Client | Ruolo | Può scambiare token? |
|---|---|---|
agent |
Ottiene il token dell’utente (password grant, solo scorciatoia da laboratorio) | No |
mcp-server |
Scambia il token dell’utente | Sì |
payments-api |
Solo un’audience, l’API a valle | No |
Configurazione#
Keycloak 26.8.2 è stato eseguito dalla distribuzione zip con Java 21, in modalità sviluppo e da un’estrazione pulita. La modalità sviluppo serve solo per i laboratori. Le password sono valori usa e getta; in questo articolo compaiono come <lab-password> e <client-secret>.
export KC_BOOTSTRAP_ADMIN_USERNAME=admin KC_BOOTSTRAP_ADMIN_PASSWORD=<lab-password>
keycloak-26.8.2/bin/kc.sh start-dev --http-port 8080
./kc-lab.sh   # creates realm agentlab, user alice, the three clients and two audience scopes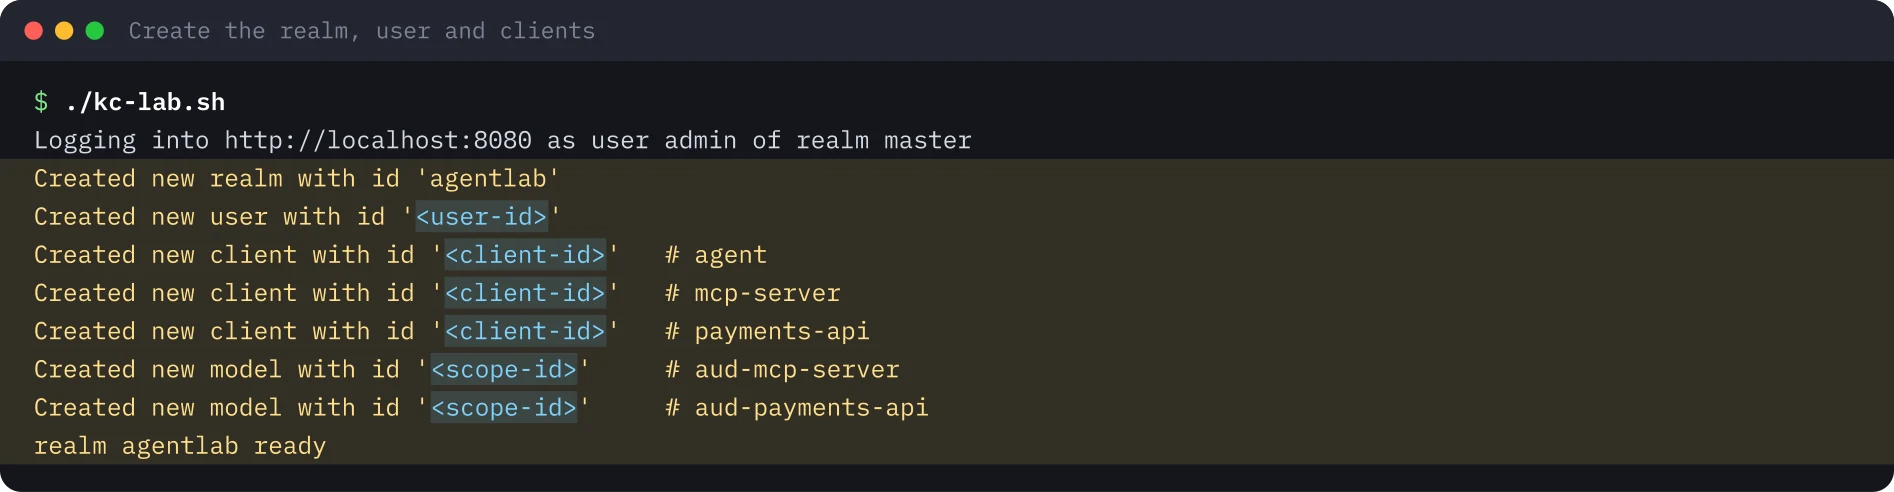
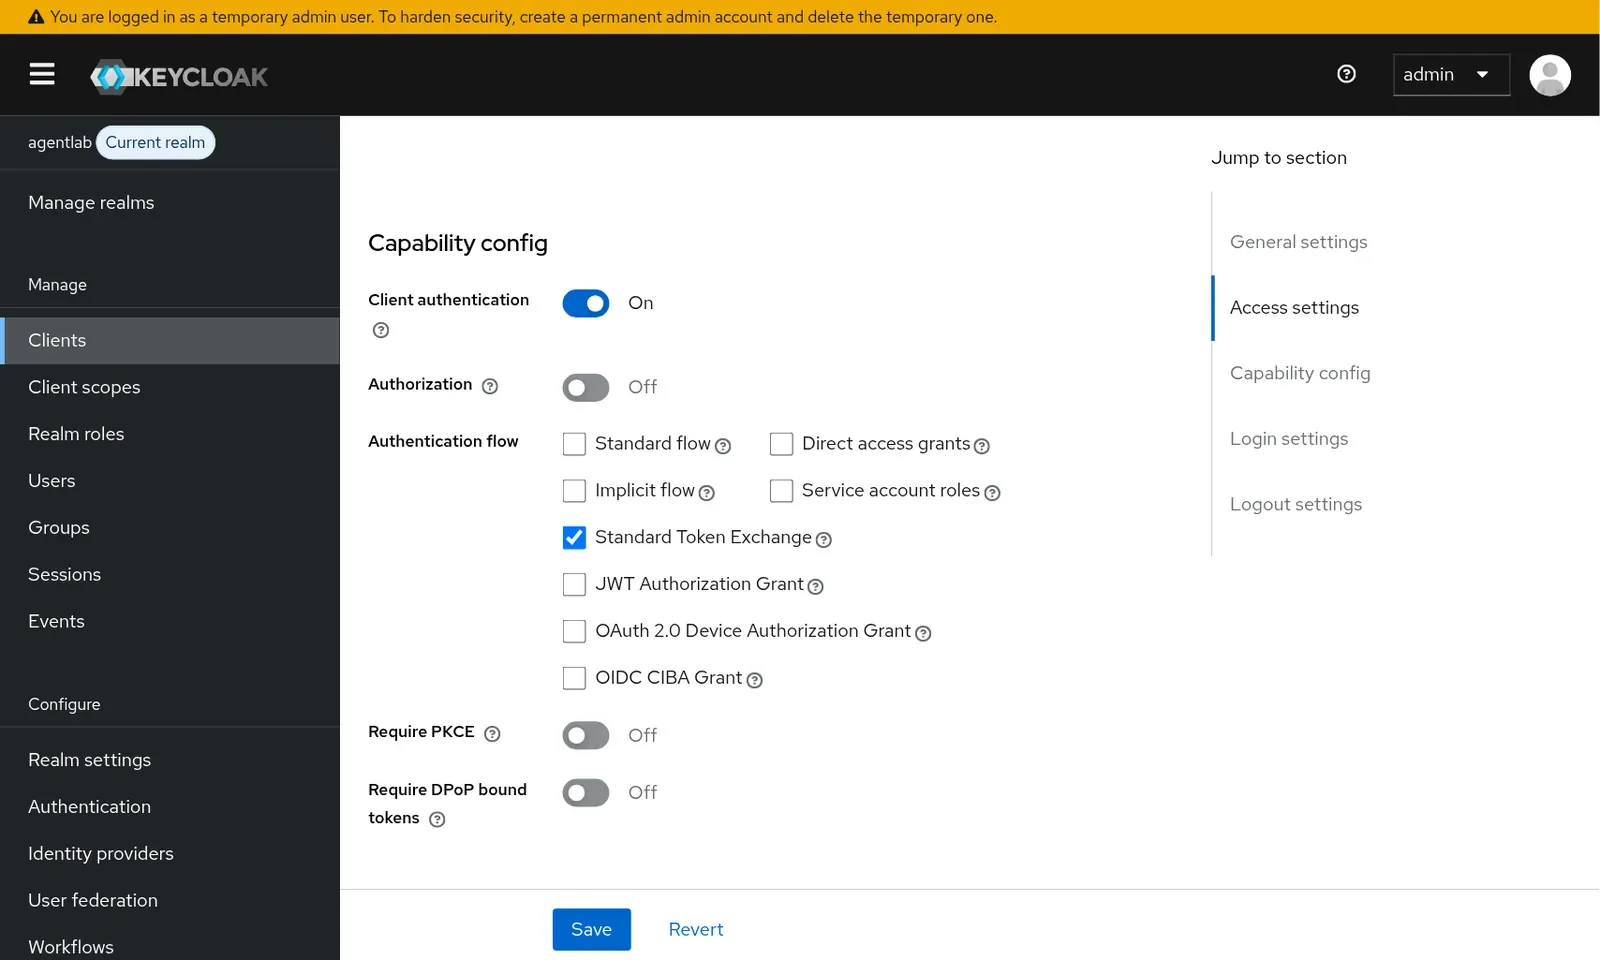
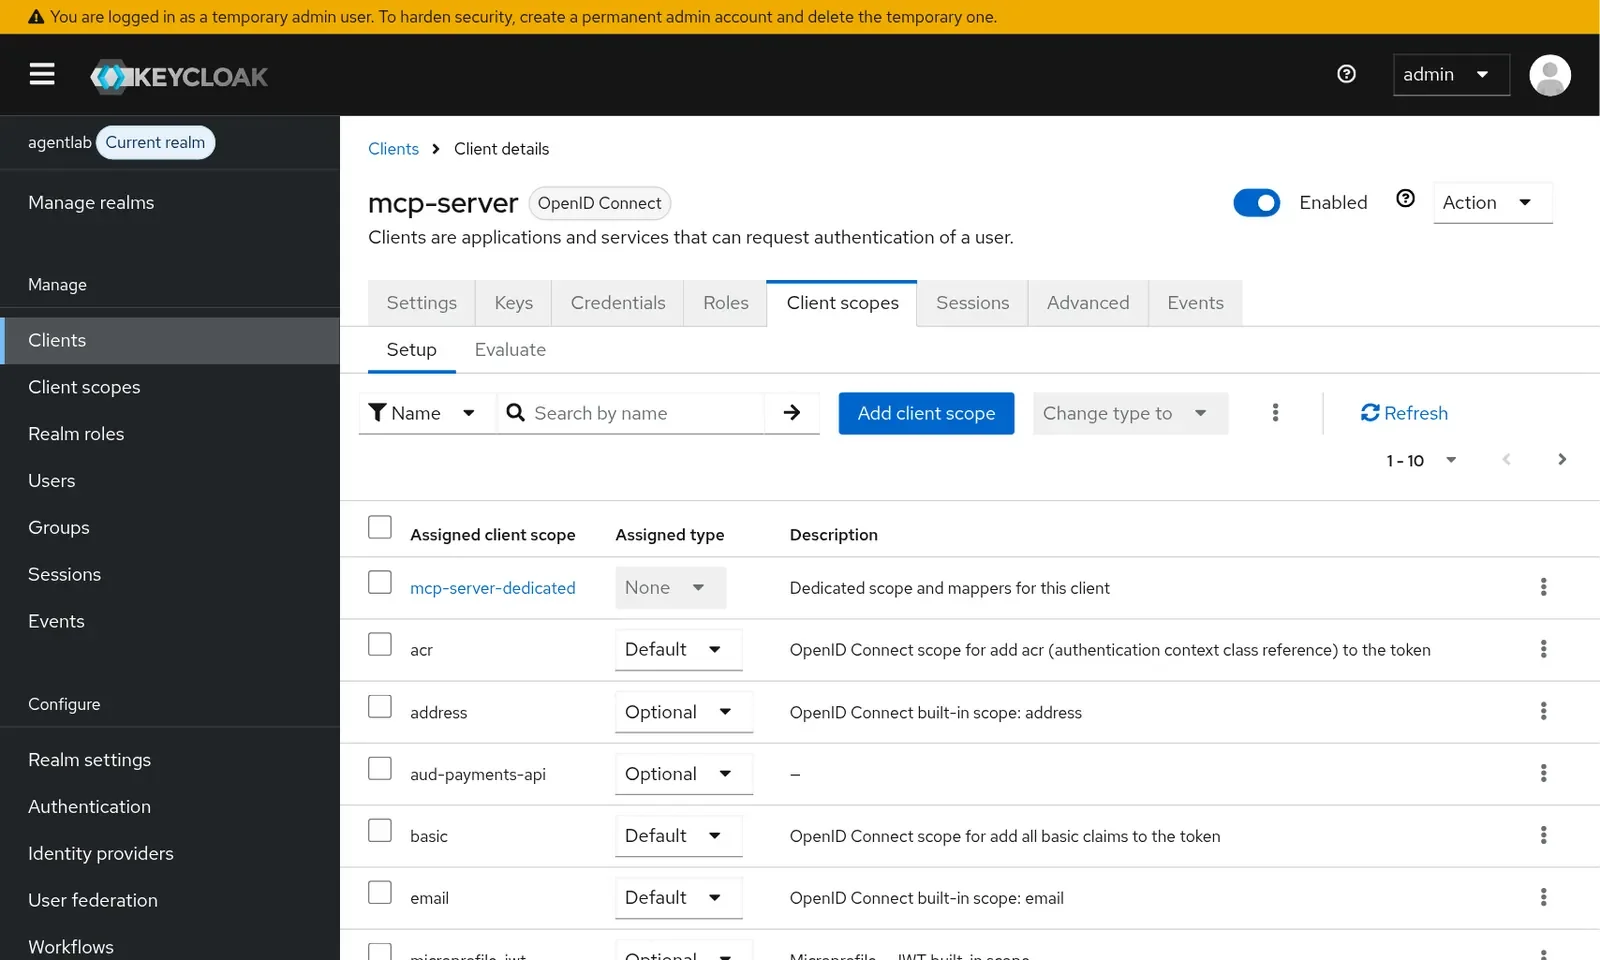
Nella console di amministrazione due impostazioni reggono il progetto. Solo mcp-server ha attivo Standard Token Exchange, e l’audience a valle è uno scope opzionale, quindi viene aggiunta solo quando lo scambio la richiede.
L’esecuzione#
L’agente ottiene un token utente, poi il server MCP lo scambia. La richiesta centrale è una sola chiamata all’endpoint dei token:
curl -s -u mcp-server:<client-secret> \
  -d grant_type=urn:ietf:params:oauth:grant-type:token-exchange \
  -d subject_token="$USER_AT" \
  -d subject_token_type=urn:ietf:params:oauth:token-type:access_token \
  -d requested_token_type=urn:ietf:params:oauth:token-type:access_token \
  -d audience=payments-api -d scope=aud-payments-api "$TOKEN_URL"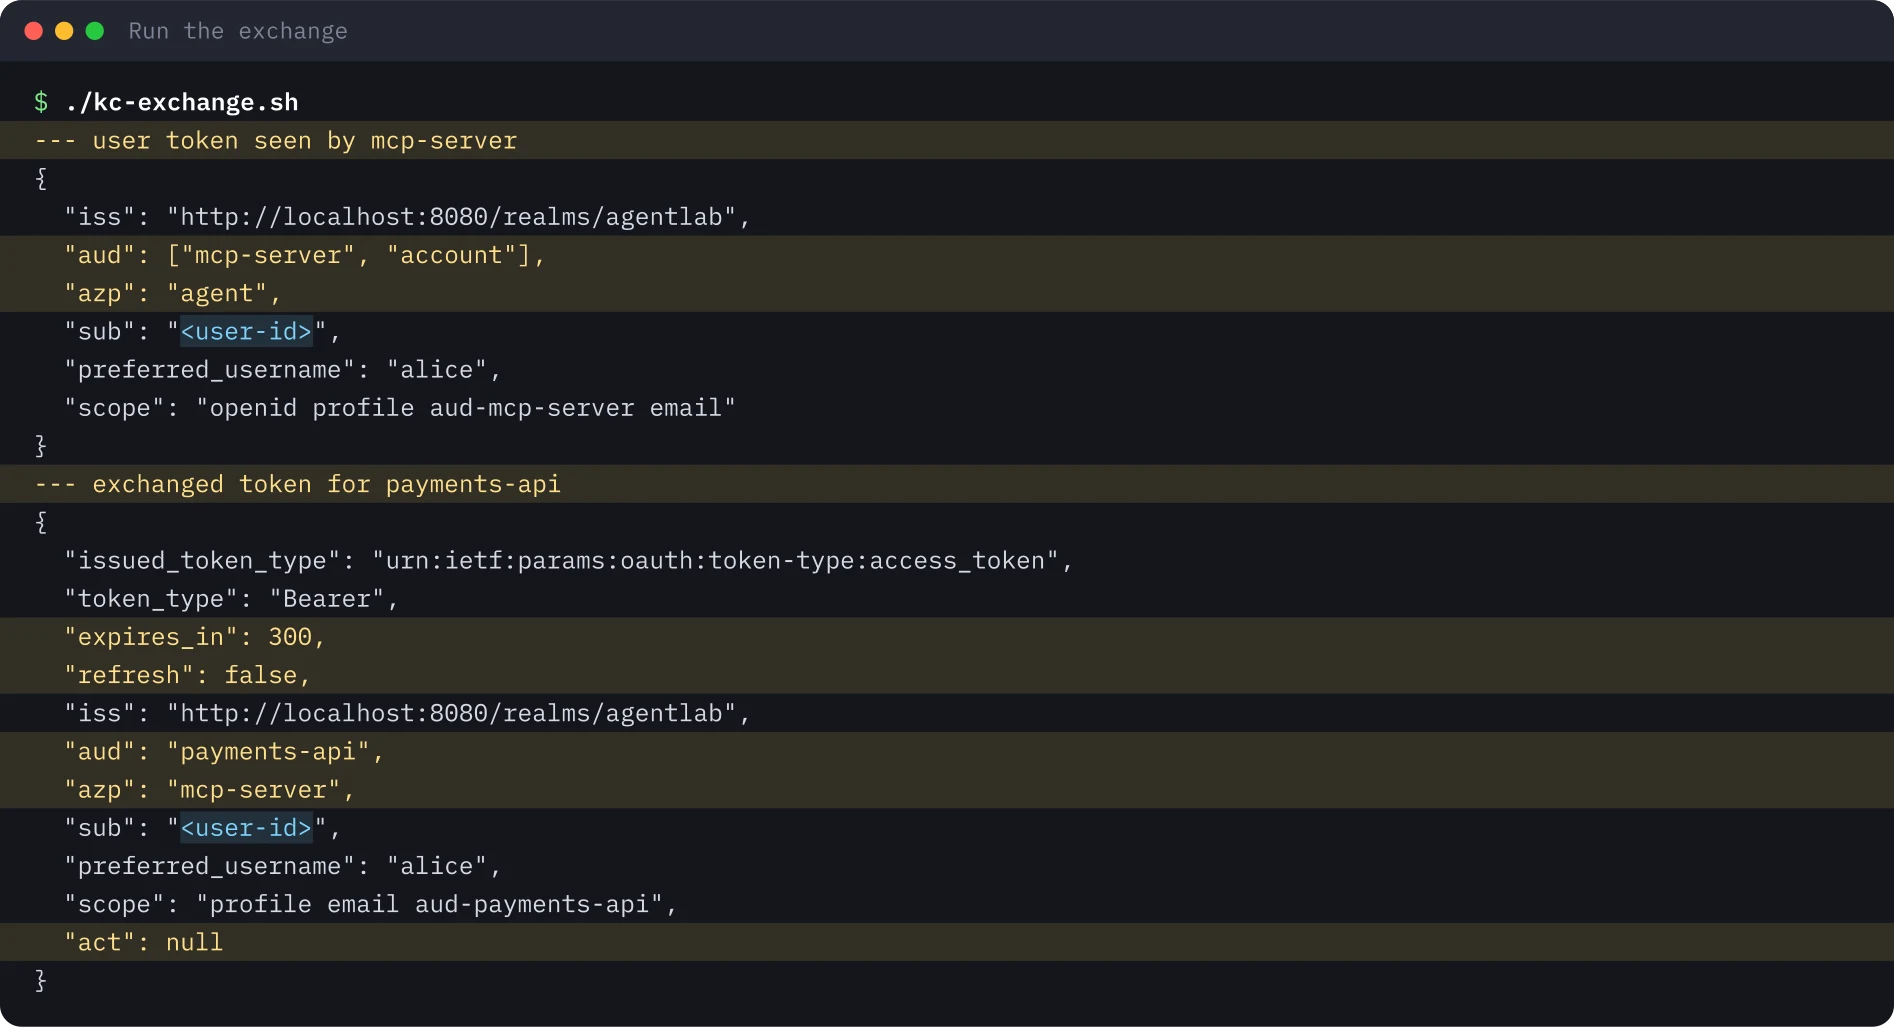
Confrontando i due token: il soggetto è invariato, l’audience è ora solo l’API di pagamenti, la parte autorizzata (azp) indica il server MCP, la durata è di 300 secondi e non viene restituito alcun refresh token. Non c’è il claim act: il supporto di Keycloak alla delega è una funzione in anteprima, disattivata per impostazione predefinita, quindi l’attore compare solo come azp.
Farlo fallire di proposito#
Tre scambi devono essere rifiutati. Verificate gli stessi tre in qualsiasi identity provider prima di affidargli la delega per gli agenti.
Insidie#
- Il password grant è una scorciatoia. Il laboratorio lo usa solo per ottenere in fretta un token utente. RFC 9700 e OAuth 2.1 lo escludono per i client reali; usate l’authorization code flow con PKCE.
- Il claim
audpuò elencare più del previsto. Introspezionando il token scambiato sono comparsi l’API di pagamenti eaccount. Capitelo prima di fare affidamento sui controlli di audience. - L’ordine degli scope varia da un’esecuzione all’altra, quindi non confrontate le stringhe alla lettera.
- Nessun claim
actdi default. Se l’audit richiede l’attore, pianificate la funzione di delega in anteprima oppure ricostruite voi il collegamento tramiteazpnei log.
Indicazioni di sicurezza#
- Il token exchange è un privilegio. Concedetelo al solo client che ne ha bisogno.
- Rendete l’audience a valle esplicita e opzionale, così i token scambiati restano ristretti per impostazione predefinita.
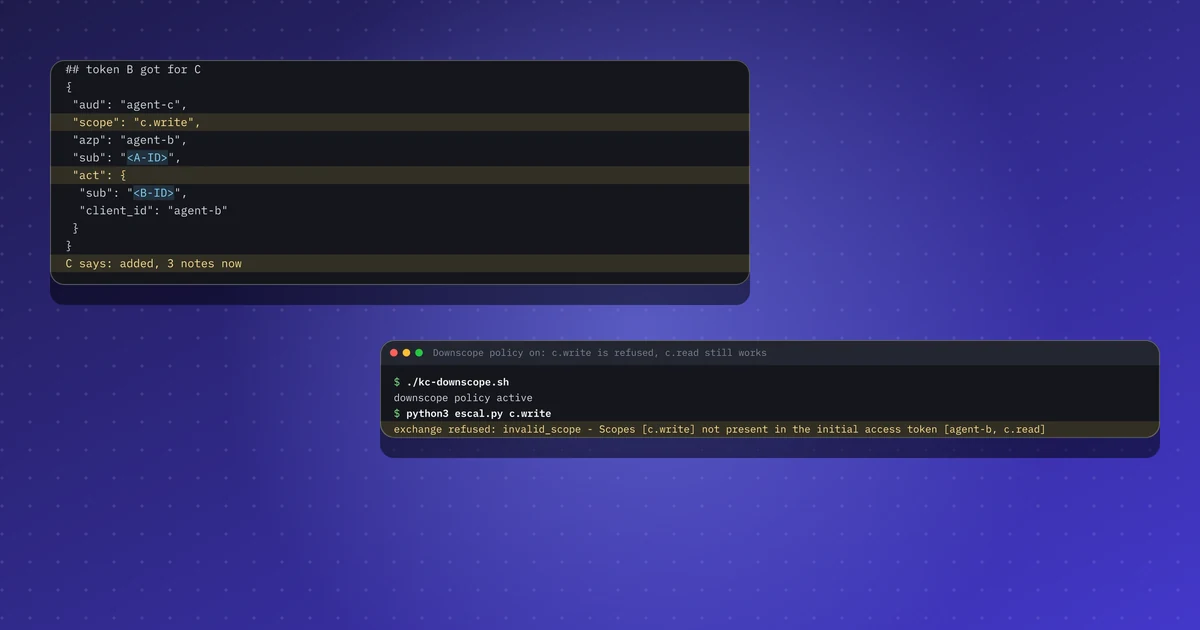
- Non rilasciate mai refresh token in uno scambio. Il server del laboratorio li rifiuta.
- Un servizio deve rifiutare i token non emessi per lui e scambiare per ogni API a valle, senza mai inoltrare il token dell’utente.
- Verificate cosa può ricostruire la vostra traccia di audit. Se l’attore compare solo come
azp, serve una riga di log che colleghi utente, agente e audience a valle.
Cosa non è stato eseguito#
Non sono state eseguite la variante Docker, le attività aggiuntive (refresh token nello scambio standard, introspezione da parte dell’API a valle) e la funzione di delega in anteprima che aggiungerebbe act. Il laboratorio ha usato solo account usa e getta. Per questo laboratorio non viene pubblicata alcuna registrazione.
Le immagini del terminale sono state generate dall’output salvato dell’esecuzione, con identificatori e segreti sostituiti da segnaposto. Gli screenshot della console Keycloak mostrano solo oggetti di prova.
Ripeti questo lab#
Tutto ciò che serve per eseguire questo lab su un portatile in circa 45 minuti: un Keycloak locale, uno script che crea il realm, uno che esegue lo scambio e tre che devono fallire. Apri ogni passo, copia i blocchi e confronta il tuo output con quello atteso.
Ogni valore tra parentesi angolari è un segnaposto per il tuo ambiente di test. Nulla in questa pagina è un identificativo o un segreto reale.
Imposta le variabili una sola volta
# Paste into every terminal you use for this lab. Replace each <PLACEHOLDER> with a throwaway value of your own.
export KC_VERSION="26.8.2"
export KC_URL="http://localhost:8080"
export KC_REALM="agentlab"
export KC_ADMIN_USER="admin"
export KC_ADMIN_PASSWORD='<ADMIN_PASSWORD>'
export ALICE_EMAIL="[email protected]"
export ALICE_PASSWORD='<ALICE_PASSWORD>'
export AGENT_SECRET='<AGENT_CLIENT_SECRET>'
export MCP_SECRET='<MCP_SERVER_CLIENT_SECRET>'
export PAYMENTS_SECRET='<PAYMENTS_API_CLIENT_SECRET>'
export TOKEN_URL="$KC_URL/realms/$KC_REALM/protocol/openid-connect/token"
0 di 6 passi fatti
Passo 1Avvia Keycloak in modalità sviluppo
Obiettivo. Esegui un server di autorizzazione locale che controlli completamente, per vedere cosa cambia dentro un token con lo scambio.
Prerequisiti
- Java 21 (ad esempio Eclipse Temurin), curl, jq e unzip
- Porta 8080 libera; lascia aperto questo terminale e usane un secondo per i passi successivi
curl -LO "https://github.com/keycloak/keycloak/releases/download/$KC_VERSION/keycloak-$KC_VERSION.zip"
unzip -q "keycloak-$KC_VERSION.zip"
export KC_BOOTSTRAP_ADMIN_USERNAME="$KC_ADMIN_USER" KC_BOOTSTRAP_ADMIN_PASSWORD="$KC_ADMIN_PASSWORD"
"keycloak-$KC_VERSION/bin/kc.sh" start-dev --http-port 8080
Output atteso
Running the server in development mode. DO NOT use this configuration in production.
INFO  [org.keycloak.services] (main) KC-SERVICES0077: Created temporary admin user with username admin
INFO  [io.quarkus] (main) Keycloak 26.8.2 on JVM (powered by Quarkus 3.40.1.1) started in 8.418s. Listening on: http://localhost:8080
INFO [io.quarkus] (main) Profile dev activated.Passo 2Crea il realm, l'utente e tre client
Obiettivo. Costruisci il realm agentlab con l'utente alice e tre client: agent riceve il token dell'utente, mcp-server può scambiarlo, payments-api è solo un'audience.
Prerequisiti
- Passo 1 completato e Keycloak in esecuzione; le variabili all'inizio di questa sezione impostate in questo secondo terminale
- Esegui dalla cartella che contiene la directory keycloak
#!/usr/bin/env bash
# Realm, user, three clients and two audience scopes. Lab only: throwaway secrets.
set -euo pipefail
KCADM="keycloak-$KC_VERSION/bin/kcadm.sh"
$KCADM config credentials --server "$KC_URL" --realm master --user "$KC_ADMIN_USER" --password "$KC_ADMIN_PASSWORD"
$KCADM create realms -s realm="$KC_REALM" -s enabled=true
$KCADM create users -r "$KC_REALM" -s username=alice -s enabled=true -s email="$ALICE_EMAIL" -s emailVerified=true -s firstName=Alice -s lastName=Lab
$KCADM set-password -r "$KC_REALM" --username alice --new-password "$ALICE_PASSWORD"
# Downstream API: only an audience
$KCADM create clients -r "$KC_REALM" -s clientId=payments-api -s publicClient=false -s secret="$PAYMENTS_SECRET" -s standardFlowEnabled=false -s directAccessGrantsEnabled=false
# MCP server: confidential, allowed to exchange tokens
$KCADM create clients -r "$KC_REALM" -s clientId=mcp-server -s publicClient=false -s secret="$MCP_SECRET" -s standardFlowEnabled=false -s directAccessGrantsEnabled=false -s 'attributes."standard.token.exchange.enabled"=true'
# Agent: gets the user token (password grant only because this is a lab)
$KCADM create clients -r "$KC_REALM" -s clientId=agent -s publicClient=false -s secret="$AGENT_SECRET" -s directAccessGrantsEnabled=true -s standardFlowEnabled=true -s 'redirectUris=["http://localhost:6274/*"]'
# Client scopes that add audiences
for AUD in mcp-server payments-api; do
  SID=$($KCADM create client-scopes -r "$KC_REALM" -s name=aud-$AUD -s protocol=openid-connect -s 'attributes."include.in.token.scope"=true' -i)
  $KCADM create client-scopes/$SID/protocol-mappers/models -r "$KC_REALM" -s name=aud-$AUD -s protocol=openid-connect -s protocolMapper=oidc-audience-mapper -s "config.\"included.client.audience\"=$AUD" -s 'config."access.token.claim"=true'
done
AGENT=$($KCADM get clients -r "$KC_REALM" -q clientId=agent --fields id --format csv --noquotes)
MCP=$($KCADM get clients -r "$KC_REALM" -q clientId=mcp-server --fields id --format csv --noquotes)
S1=$($KCADM get client-scopes -r "$KC_REALM" --fields id,name --format csv --noquotes | awk -F, '$2=="aud-mcp-server"{print $1}')
S2=$($KCADM get client-scopes -r "$KC_REALM" --fields id,name --format csv --noquotes | awk -F, '$2=="aud-payments-api"{print $1}')
# agent always gets the mcp-server audience; mcp-server may ask for payments-api as an optional scope
$KCADM update clients/$AGENT/default-client-scopes/$S1 -r "$KC_REALM"
$KCADM update clients/$MCP/optional-client-scopes/$S2 -r "$KC_REALM"
echo "realm $KC_REALM ready"chmod +x kc-lab.sh && ./kc-lab.shOutput atteso
Logging into http://localhost:8080 as user admin of realm master
Created new realm with id 'agentlab'
Created new user with id '<user-id>'
Created new client with id '<client-id>'
Created new client with id '<client-id>'
Created new client with id '<client-id>'
Created new model with id '<scope-id>'
Created new model with id '<scope-id>'
realm agentlab readyPasso 3Ottieni il token dell'utente come agent
Obiettivo. Ottieni il token che riceverà il server MCP e decodificalo, così hai un riferimento con cui confrontare il token scambiato.
Prerequisiti
- Passo 2 completato (il realm agentlab esiste)
- Il password grant è solo una scorciatoia da lab; i client reali usano il flusso authorization code con PKCE
jwtp() { cut -d. -f2 | tr '_-' '/+' | awk '{l=length($0)%4; if(l==2)$0=$0"=="; else if(l==3)$0=$0"="; print}' | base64 -d 2>/dev/null; }
USER_AT=$(curl -s -d grant_type=password -d client_id=agent -d client_secret="$AGENT_SECRET" \
  -d username=alice -d password="$ALICE_PASSWORD" -d scope=openid "$TOKEN_URL" | jq -r .access_token)
echo "--- user token seen by mcp-server"
echo "$USER_AT" | jwtp | jq '{iss,aud,azp,sub,preferred_username,scope}'
Output atteso
--- user token seen by mcp-server
{
  "iss": "http://localhost:8080/realms/agentlab",
  "aud": ["mcp-server", "account"],
  "azp": "agent",
  "sub": "<user-id>",
  "preferred_username": "alice",
  "scope": "openid profile aud-mcp-server email"
}Passo 4Scambialo come server MCP (RFC 8693)
Obiettivo. Scambia il token dell'utente con uno più ristretto, destinato solo alla API dei pagamenti, e controlla cosa è cambiato.
Prerequisiti
- Passo 3 completato nello stesso terminale, così USER_AT è impostato
curl -s -u "mcp-server:$MCP_SECRET" \
  -d grant_type=urn:ietf:params:oauth:grant-type:token-exchange \
  -d subject_token="$USER_AT" \
  -d subject_token_type=urn:ietf:params:oauth:token-type:access_token \
  -d requested_token_type=urn:ietf:params:oauth:token-type:access_token \
  -d audience=payments-api -d scope=aud-payments-api "$TOKEN_URL" > exch.json
jq '{issued_token_type,token_type,expires_in,scope, refresh: (has("refresh_token"))}' exch.json
echo "--- exchanged token for payments-api"
jq -r .access_token exch.json | jwtp | jq '{iss,aud,azp,sub,preferred_username,scope,act}'
Output atteso
{
  "issued_token_type": "urn:ietf:params:oauth:token-type:access_token",
  "token_type": "Bearer",
  "expires_in": 300,
  "scope": "aud-payments-api profile email",
  "refresh": false
}
--- exchanged token for payments-api
{
  "iss": "http://localhost:8080/realms/agentlab",
  "aud": "payments-api",
  "azp": "mcp-server",
  "sub": "<user-id>",
  "preferred_username": "alice",
  "scope": "aud-payments-api profile email",
  "act": null
}Passo 5Fai fallire tre scambi di proposito
Obiettivo. Verifica i tre rifiuti che impediscono a un anello compromesso di ampliare il proprio raggio: nessun privilegio, nessuno scope per l'audience, nessun refresh token.
Prerequisiti
- Passo 3 completato nello stesso terminale, così USER_AT è impostato
- I token durano cinque minuti; se ricevi un errore sul token, ripeti prima il passo 3
X=(-d grant_type=urn:ietf:params:oauth:grant-type:token-exchange -d subject_token="$USER_AT"
   -d subject_token_type=urn:ietf:params:oauth:token-type:access_token)
echo "# A: a client without token exchange enabled"
curl -s -u "payments-api:$PAYMENTS_SECRET" "${X[@]}" -d audience=mcp-server "$TOKEN_URL" | jq .
echo "# B: an audience mcp-server has no scope for"
curl -s -u "mcp-server:$MCP_SECRET" "${X[@]}" -d audience=agent "$TOKEN_URL" | jq .
echo "# C: ask for a refresh token"
curl -s -u "mcp-server:$MCP_SECRET" "${X[@]}" -d audience=payments-api -d scope=aud-payments-api \
  -d requested_token_type=urn:ietf:params:oauth:token-type:refresh_token "$TOKEN_URL" | jq .
Output atteso
# A: a client without token exchange enabled
{
  "error": "invalid_request",
  "error_description": "Standard token exchange is not enabled for the requested client"
}
# B: an audience mcp-server has no scope for
{
  "error": "invalid_request",
  "error_description": "Requested audience not available: agent"
}
# C: ask for a refresh token
{
  "error": "invalid_request",
  "error_description": "requested_token_type unsupported"
}Passo 6Pulizia
Obiettivo. Ferma Keycloak ed elimina tutto ciò che il lab ha creato, compresa la distribuzione scaricata e il file del token scambiato.
Prerequisiti
- Nient'altro usa la porta 8080 o la directory keycloak
# Stop Keycloak: press Ctrl+C in the first terminal, or:
pkill -f "keycloak-$KC_VERSION" || true
rm -rf "keycloak-$KC_VERSION" "keycloak-$KC_VERSION.zip" kc-lab.sh exch.json
unset KC_ADMIN_PASSWORD ALICE_PASSWORD AGENT_SECRET MCP_SECRET PAYMENTS_SECRET USER_AT
# check: nothing listens on port 8080 any more
curl -s -o /dev/null -w "%{http_code}\n" "$KC_URL/"
Output atteso
000Fonti#
Discuti questo articolo#
Ti è stato utile? Condividilo e dimmi cosa ne pensi.
Questo articolo in formato Markdown · RSS · JSON feed
Nuovi articoli via email
Una email a settimana con nuovi articoli e lab. Disiscrizione in qualsiasi momento.
Il tuo indirizzo è salvato su Kit, il servizio che invia le email. Dettagli